Page 1 of 4
LMS Milk Tank
Posted: Fri Nov 07, 2008 1:12 pm
by Keith1500
I am starting to turn my attention to building the LMS Milk tank.
I have found this site with a couple of useful photos...
http://www.eastsomersetrailway.com/gallery.php?gid=106
along with a really nice photo on the Science Museum picture site...
http://www.scienceandsociety.co.uk/resu ... imagepos=7
That last shot show the striking livery of the UD vehicle which i think is a must have.
If anyone has any other useful infor please place it here.
Keith
Wagon photos
Posted: Tue Nov 11, 2008 11:30 pm
by Eddyg
Keith and anyone else wanting wagon pictures,
Why not have a scan of Paul Bartlett's collection on
http://gallery6801.fotopic.net/
There are literally thousands of photographs taken since 1970 of wagons coaches cranes. I had a quick look through and the only milk tankers I could see were ex GW carrying anything but milk, but I'm sure any wagon builder who hasn't seen this site will find something of use. There is even a set of photos of wagons at Gilling, each properly identified.
Regards
Eddie
Posted: Mon Mar 02, 2009 5:31 pm
by Richard Phillips
Posted: Mon Mar 02, 2009 5:34 pm
by Richard Phillips
Oh, and I forgot, the original LMS 4 wheel (subsequently converted to 6 wheel) currently sitting at Midsomer Norton
http://www.sdjr.co.uk/Graphics/homepage ... 3.2.09.jpg
And it's a shame Ray Chorely's site is now longer available. Get the archived version here (scroll down to milk tanks):
http://web.archive.org/web/200602030254 ... enger.html
Posted: Wed Mar 04, 2009 10:23 am
by Keith1500
This more like it!
Fanstic! nice to see a good collection of info coming in. This should benefit all intersted in building one of these as a model.
Thanks
KB
Posted: Tue Mar 24, 2009 4:46 pm
by Richard Phillips
I think the MMB tank illustrated on this site is the same diagram the kit is based on but I'd need to check my book, either way a few milk tanker pictures here:
http://ray.fotopic.net/c397986.html
Posted: Thu Apr 30, 2009 12:01 pm
by Keith1500
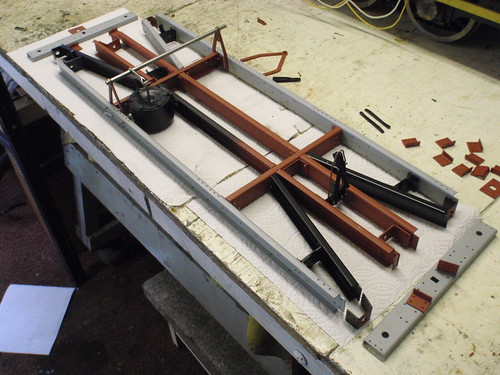
At long last I have made a start on building the Milk Tank chassis.
I have started by mounting the various small brackets on the chassis components. things like Vacuum cylinder brackets and brake hanger brackets.
I'll then build the chassis in sub assemblies to allow further items such as brakes or brake shafts to be added. once confident nothings been over looked I'll do the final assembly.
Keith
Posted: Thu Apr 30, 2009 2:53 pm
by Richard Phillips
I've taken a few build photos, I've been meaning to put some pictures on the web and some other full size photos and information eventually.
Dave sent me a separate drawing of the positioning of the vac cylinder that I didn't have with the first kit so you should have that one. I should have worked it out from the positioning of the vac cylinder shaft arm... but mine is positioned marginally too close to the shaft.
There's a lot of work in that chassis I'm starting to realise. I've got a lot of work still to do. No wonder not many milk tankers are on the rails yet!
Posted: Tue May 05, 2009 9:07 am
by Keith1500
Yes, I should do the same - post some pictures somewhere. What would be a good site to use for this?
Installing the vacuum cylinder worried me. I couldn’t see how i could achieve it given the bolts are right behind the cylinder and i didnt want to assemble it as i buit the chassis. In the end I filled the holes in the small bracket that attaches to the sole bar and drilled and tapped it 10BA. I made two "bolts" by soldering a nut on to some 10BA of cuts. It assemblies easy enough and looks right from the outside.
Just in the process of doing the brake shoe hangers.
Posted: Tue May 05, 2009 6:47 pm
by Richard Phillips
Keith1500 wrote:Yes, I should do the same - post some pictures somewhere. What would be a good site to use for this?
Yahoo's Flickr? There's a few places that allow you to image upload.
As for the Vac cylinder, you're right, no scale fitter with his spanner means it's tough to access and I just fixed it in place and riveted the solebar on hoping I'd never have to take it off again. Nice idea about tapping the lug.
Posted: Thu May 07, 2009 10:47 pm
by Keith1500
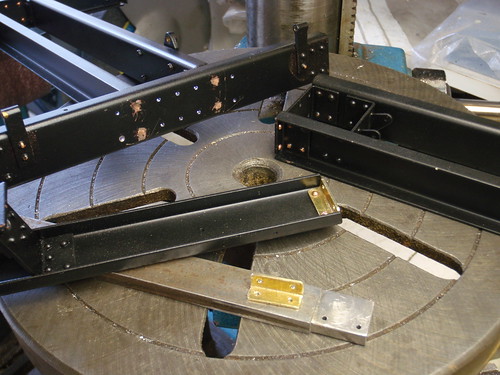
Progressing well with the build ~ though reading through my notes i made on the drawing i forgot to flush rivet the rivets on the buffer knees!
As you can see I am building it in sub assemblies and painting as I go.
Posted: Tue May 26, 2009 9:21 am
by Keith1500
Anyone tried squaring of the corners of the head stocks? That is building up the corners to hide the curvature of the bent channel.
Posted: Tue May 26, 2009 12:24 pm
by Richard Phillips
Keith1500 wrote:Anyone tried squaring of the corners of the head stocks? That is building up the corners to hide the curvature of the bent channel.
I know Dave did it, for me the build is long enough as it is. Having seen it, it does improve the look of the wagon, but as you can see a lot of the other frame channel as well I elected not to.
About time I uploaded some images of progress, anyway, here's one:

Posted: Tue May 26, 2009 8:14 pm
by Keith1500
Wow! that does look impressive. Nice work Richard.
I am just in the process of squaring off my head stocks. I have used car body filler. It still requires a bit of work but i think its a lot easier than soldering etc. I am not going to do the others though.
Keith
Posted: Thu May 28, 2009 6:50 pm
by Paul
Good to see that pic in the public domain Rich! It looks excellent and as I said before doesn't require painting, just some heavy weathering and it will look just as they did in the 50's/60's!
I'll see if I can get a progress pic of mine up too, although due to the slower progress of my tank i'm almost embarrased to do so!

Like the idea of the car body filler for the headstocks Keith, that's got me thinking about mine now, wondering if I progressed to far though! (Not often I can say that!

) Might take the easy route and leave it as is.
So with the 3 milk tankers on the go and Dave Caple cracking on with his 2, that accounts for the majority of the latest batch (apologies for anyone i've missed). I know Dave Noble's milk tank is 98% complete and that Clive Young and Hugh Topham have tanks running from the first batch but where are the rest! Let's see some pics of a few more under construction, the more the merier!
Posted: Thu May 28, 2009 10:58 pm
by Keith1500
Here are my head stocks.

if using filler best applied to the a bare component.
I had in place the square plate that surounds the coupling hook and ended up removing it so I could work the filler easily and not get it all over that plate!
Posted: Tue Jun 09, 2009 10:57 pm
by Keith1500
Aaaahhh ! many rivets later I seem to have been able to rivet together part of the chassis. This is more complicated than my Cuneo puzzle of Crewe!! (Voltage and Steam - TriangHornby 1966)
Thanks to Alan for putting me right about NOT annealing the rivets before I use them. This makes for easy riveting but dosent really give the joint a great deal of strength. So... when I did my diagonals and eased them to the right angle the joint became loose.
What kind of tool would reach in to do the rivets immediately behind the diagonal on the cross bearer to centre longitinals? I have had to cheat a bit here.
Keith
Posted: Wed Jun 10, 2009 10:58 am
by Richard Phillips
I just accepted they would be loose, they're locked in by the knee behind the headstock at the buffer, so even though they'll wag from side to side when you've riveted one end, once you've got the headstock on (as far as I'm concerned) it won't matter.
Posted: Wed Jun 10, 2009 5:30 pm
by Paul
Keith,
If you are referring to the longitudinals next to the diagonals I think I managed to squeeze Dave's riviting tool into the gap once I'd eased the diagonal to it's final position. The knee's for the longitudinals were already rivited to the cross bearer before fitting the diagonal's so I only had to slide the channel of the 2 end sub assemblies into position. I don't think I managed to get a perfect head on the rivet's in question but it is very rigid.
As Richard mentioned, the diagonal's will be a bit sloppy at first, however they do stiffen up once rivetted to the solebar. I'd advice careful use of a hammer to locate the diagonal as close to the cross bearer as possible. This ensure's that the headstock's can be rivetted on without causing any bowing.
If you're going to Brent's this weekend please come armed with any questions. If useful I can bring the chassis with me? Likewise bring your's along if it would help to illustrate any questions you have.
Posted: Wed Jun 10, 2009 8:01 pm
by Keith1500
Paul/Richard,
I'll try to remember to bring the chasis up to Brents this weekend.
Had a go at it this afternoon and have now assemble the centre. In order to get a full complement of rivets where they should be I did a bit of a cheat!!
see here...
Now in the process of fitting the head stocks
