Can anyone provide information on sheets used to cover goods in an open wagon? I would like to make up a few for use at our rallies.
I have a book :- " GENERAL INSTRUCTIONS ON HANDLING,LOADING,SHEETING AND UNSHEETING OF TRAFFIC DEALT WITH AT GOOD STATIONS" what a title eh? !
...in it is a diagram on how to fold a sheet. It indicates the sheet is formed of 6 strips and has 6 tags which presumably had eyelets for the ropes.
RCH must has laid down a standard for the sheets?
Keith
Sheeting over of Open wagons
-
Ballan Baker
- Engine Driver
- Posts: 20
- Joined: Fri Feb 27, 2009 7:11 pm
Wagon sheeting
-
Richard Phillips
- Fat Controller
- Posts: 178
- Joined: Mon Feb 23, 2009 6:14 pm
Some tarpaulin info
A tarpaulin reference on the web:
http://myweb.tiscali.co.uk/gansg/9-loads/9-tarps.htm
He lists book references on the web page:
"I found pictures and descriptions of LMS sheets in 'LMS Wagons Vol.2' by R.J.Essery. MR sheets are described in 'Midland Wagons Vol.1' also by R.J.Essery.
The SR sheet is from a photograph taken in about 1938. The LSWR sheet is from 'Southern Wagons Vol.1' whilst the LBSC and SECR sheets are from 'Southern Wagons Vol.2'.
The LNER sheet is from 'A Pictorial Survey of LNER Wagons' by Peter Tatlow. Mr Tatlow suggests that the later version had LNE and the number at each end only however the only photographs I have found (Wagons & Loads on the GWR and BR/WR by J.H.Russel) show only NE.
The GWR sheets are drawn from photographs in 'GWR Company Servants' by J.K.Russel."
Mine was made using the Midland Wagons drawing in the Essery book.
Some China Clay wagon photos with tarps for weathering reference:
http://gallery6801.fotopic.net/c980567.html
Richard,
Some very good info there. You mention yours was made using the Midland Wagons drawing - i presume you are refedring to a sheet. How did you go about this and is it complete with eylets, rope etc?
If so what did you used toe "treat" the fabric with?
I am inlcined to machine (sewing machine that is not Mill! ) a piece up and then treat it with a dye and some linseed oil, followed by stenciling.
Keith
-
Richard Phillips
- Fat Controller
- Posts: 178
- Joined: Mon Feb 23, 2009 6:14 pm
My mum offered to make a tarp so I accepted! (is there any difference between the terminology of a "sheet" and a "tarpaulin"?) It is made with 5 panels and the seam lines up with the sides of the wagon with one panel hanging over each side.Keith1500 wrote:Richard,
Some very good info there. You mention yours was made using the Midland Wagons drawing - i presume you are refedring to a sheet. How did you go about this and is it complete with eylets, rope etc?
If so what did you used toe "treat" the fabric with?
I am inlcined to machine (sewing machine that is not Mill! ) a piece up and then treat it with a dye and some linseed oil, followed by stenciling.
Keith
I sent her the dimensions scaled from the book. The MK I version was just made with black cloth and looks a little... new-ish, but my wagon hasn't been weathered yet (it's first run out is probably this weekend).
Having started to look my mum found some small eyelets at a craft fair that I haven't seen as yet that might be suitable. I picked up some electrical terminations for a doll's house at my local model shop but I would still need to make a press tool to push them in.
As for rope, look in the model boats section of a model shop. There is some good "scale" rope.
I need to make stencils for the markings and am at this stage thinking of spraying the lettering on with a masking template.
I'm thinking of going the other way and not dyeing the fabric, but bleaching it.
Blimey, I can see a "Turnout" article coming out of this if there hasn't been one already
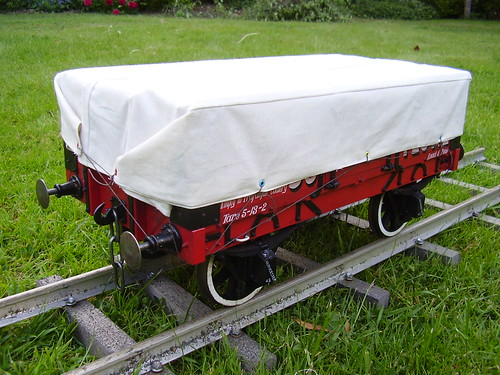
I had a go at making up a sheet. I formed five sections by forming a seam and sewing along it. Each strip was 2 & 5/8inch wide. I derived this measurement by the width of my Gloucester wagon and dividing this 3.
Then in hindsight i realised the width would have been base on the max width produced by weaving looms. This is mentioned in a wonderful book loaned to me by Dave N. Midland Record. The width being 36inches, therefore i think 2 3/4 or 3inches would have been better.
just looking to colour it up and add eyelets and strings.
Keith
-
Richard Phillips
- Fat Controller
- Posts: 178
- Joined: Mon Feb 23, 2009 6:14 pm
Difficult to know if they would have used the full width of the cloth, but the minimum across the body opening of the wagon would have been three strips, with an allowance for the folded over seam, I don't know how wide that would have been.
Anyway, I was looking for eyelets, and searching on the net for "eyelet setters" should bring up pretty much what you need. "Fiskars" does craft supplies and the relevant eyelets in 1/16", 1/8" & 3/16", although you'll probably have to paint them a different color.
Anyway, I was looking for eyelets, and searching on the net for "eyelet setters" should bring up pretty much what you need. "Fiskars" does craft supplies and the relevant eyelets in 1/16", 1/8" & 3/16", although you'll probably have to paint them a different color.
I have had a go at making a sheet and used Fiskers 1/8th eyelets obtained from John lewis. But as Richard pointed out they are painted and none are black !
Anyway, here is a photo of it prior to the being dyed grey and having the eyelets being painted black.
 [/url][[/img]
 [/url][[/img]
There definitely room for improvement, but for a first attempt i am quite pleased with it.
And if it had'nt turned out quite so good? - well simple folded it up as per the regluations and place it in the corner of an empty wagon !
Keith
Anyway, here is a photo of it prior to the being dyed grey and having the eyelets being painted black.
[/url][[/img][/url][[/img]There definitely room for improvement, but for a first attempt i am quite pleased with it.
And if it had'nt turned out quite so good? - well simple folded it up as per the regluations and place it in the corner of an empty wagon !
Keith
Last edited by Keith1500 on Thu Oct 07, 2010 8:54 am, edited 3 times in total.
-
Richard Phillips
- Fat Controller
- Posts: 178
- Joined: Mon Feb 23, 2009 6:14 pm
What is the press tool like? Looks like a spring loaded punch based on the photos. If you're off to Gilling this weekend would you mind bringing it with you? Mine doesn't have eyelets at the moment as it is just the "test" sheet/tarp I made.
They do make a real visual difference though, even the first attempt on mine I thought looked pretty good and I doubt this one will be "retired", as you say - fold it up and put it in the corner of a wagon!
Next thing is the lettering I guess - and that appears to be anyone's guess - most I've seen are faded and difficult to make out even if you have a "top down" view of the wagon.
ok - I'll bring the eyelet tool along with me this weekend.
Yes its two tools in one joined together with a spring. One end you have the punch for cutting the hole and at the other the die for folding the eyelet over. You basically hold the tool firmly down and pull the other end upward thus stretching the spring. Then let it snap back thumbing the tool into the work. it requires three or so goes to do the job.
With the material I used I think it would have frayed so each eyelet had a smear of super glue around it bond the loose ends of the material etc. The sheet required 16 eyelets. I'll have it fitted to the Somerset wagon this weekend.
The lettering Iwas thinking of doing using a paint pen but no sure how good my free hand writing would be.
by- the-way I used antique grey which I think is quite acceptable. i have just waterproofed it too !!